Installing a mini linear actuator might seem like a daunting task, but with the right guidance, it can be a straightforward process. As a trusted supplier of high - quality mini linear actuators, I'm here to walk you through the installation steps to ensure you get the most out of your product.
Understanding Mini Linear Actuators
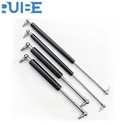
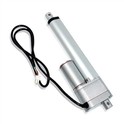
Before we dive into the installation process, it's important to understand what a mini linear actuator is and its common applications. A mini linear actuator is a compact device that converts rotational motion into linear motion. It's widely used in various industries due to its small size, high precision, and reliable performance. For instance, you can find them in Linear Actuator for Electric Sofa, which helps in adjusting the position of the sofa for maximum comfort. They are also used in robotics, medical equipment, and automation systems.
Tools and Materials Needed
To install a mini linear actuator, you'll need the following tools and materials:
- Screwdriver Set: Different sizes of flat - head and Phillips - head screwdrivers are essential for removing and attaching components.
- Wrenches: A set of adjustable wrenches will come in handy for tightening nuts and bolts.
- Drill and Drill Bits: If you need to create new holes for mounting the actuator, a drill with appropriate drill bits is required.
- Mounting Hardware: This includes bolts, nuts, washers, and brackets. Make sure to choose the hardware that is compatible with your actuator and the surface where it will be mounted.
- Electrical Connectors: Depending on the power source of your actuator, you'll need the right electrical connectors to establish a proper electrical connection.
- Multimeter: A multimeter is useful for testing the electrical connections and ensuring that the actuator is receiving the correct voltage.
Step - by - Step Installation Guide
Step 1: Planning and Preparation
- Choose the Mounting Location: Select a suitable location for the mini linear actuator. Consider factors such as the available space, the range of motion required, and the stability of the mounting surface. The location should allow the actuator to move freely without any obstructions.
- Measure and Mark: Use a measuring tape to measure the dimensions of the actuator and the mounting holes. Mark the positions on the mounting surface accurately. Double - check your measurements to avoid any mistakes.
Step 2: Mounting the Actuator
- Attach the Brackets: If your actuator comes with mounting brackets, attach them to the actuator using the provided bolts and nuts. Make sure the brackets are securely fastened.
- Position the Actuator: Place the actuator in the marked location on the mounting surface. Align the holes on the brackets with the holes on the mounting surface.
- Insert the Bolts: Insert the bolts through the holes in the brackets and the mounting surface. Add washers between the nuts and the surface to prevent damage and ensure a secure fit. Tighten the nuts using a wrench.
Step 3: Electrical Connection
- Identify the Power Requirements: Refer to the actuator's manual to determine the power requirements, including the voltage and current. Make sure your power source can provide the necessary power.
- Connect the Wires: Connect the wires from the actuator to the power source using the appropriate electrical connectors. Follow the wiring diagram provided in the manual. If you're unsure, it's recommended to consult an electrician.
- Test the Connection: Use a multimeter to test the electrical connection. Check for continuity and ensure that the voltage at the actuator terminals is within the specified range.
Step 4: Linking to the Load
- Determine the Load Attachment Method: Depending on your application, you'll need to find a way to attach the actuator to the load. This could involve using a clevis, a rod end, or other mechanical connectors.
- Attach the Actuator to the Load: Connect the actuator to the load using the chosen attachment method. Make sure the connection is strong and allows for smooth movement.
Step 5: Testing the Actuator
- Power On: Turn on the power source and test the actuator's movement. Use the control mechanism, such as a switch or a controller, to extend and retract the actuator.
- Check for Smooth Operation: Observe the actuator's movement. It should move smoothly without any jerks or noises. If you notice any issues, such as binding or excessive vibration, stop the operation immediately and check for loose connections or obstructions.
- Adjust the Settings: If necessary, adjust the stroke length, speed, or force settings of the actuator according to your requirements. Refer to the manual for instructions on how to make these adjustments.
Troubleshooting Common Issues
Even after a proper installation, you might encounter some issues with your mini linear actuator. Here are some common problems and their solutions:
- Actuator Not Moving: Check the electrical connections to ensure that the actuator is receiving power. Also, verify that the control signals are being sent correctly. If the issue persists, there could be a problem with the motor or the internal components of the actuator.
- Jerky Movement: Jerky movement could be caused by loose connections, misaligned components, or a worn - out drive mechanism. Tighten all the bolts and nuts, check the alignment of the actuator, and inspect the drive mechanism for any signs of damage.
- Overheating: Overheating can occur if the actuator is overloaded or if there is a problem with the electrical circuit. Reduce the load on the actuator and check the electrical connections for any short circuits.
Different Types of Mini Linear Actuators and Their Installation Considerations
There are various types of mini linear actuators available in the market, each with its own unique features and installation requirements.


Electric Linear Actuators
Electric Linear Actuator are one of the most common types. They are powered by electricity and offer precise control over the movement. When installing an electric linear actuator, it's crucial to ensure a stable power supply and proper grounding to prevent electrical interference.
High - Speed Linear Actuators
High Speed Linear Actuator are designed for applications that require rapid movement. During installation, make sure the mounting surface is extremely stable to handle the high - speed vibrations. Also, check the lubrication of the moving parts to ensure smooth operation at high speeds.
Why Choose Our Mini Linear Actuators
As a leading supplier of mini linear actuators, we offer a wide range of products that are known for their high quality, reliability, and performance. Our actuators are manufactured using the latest technology and undergo strict quality control tests to ensure they meet the highest standards. We also provide comprehensive technical support and after - sales service to assist you with any installation or usage issues.
If you're interested in purchasing our mini linear actuators or have any questions about the installation process, we encourage you to contact us for further discussion. Our team of experts is ready to help you find the perfect solution for your specific needs.
References
- Manufacturer's Manuals for Mini Linear Actuators
- Industry Standards for Linear Actuator Installation
- Electrical Engineering Handbooks for Wiring and Power Connection Guidelines