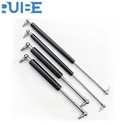
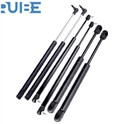
Hey there! I'm a supplier of Gas Struts For Tool Box, and today I'm gonna share with you how to replace a damaged gas strut on your tool box. It might seem a bit daunting at first, but trust me, it's not as hard as it looks.
First things first, let's talk about why you might need to replace a gas strut. Gas struts are those little things that help your tool box lid stay open or close smoothly. Over time, they can wear out, get damaged, or just stop working properly. When that happens, you'll notice that your tool box lid might not stay open, or it could slam shut unexpectedly. That's when it's time to replace the gas strut.
Tools You'll Need
Before you start the replacement process, you'll need to gather a few tools. You don't need anything too fancy, just the basics. Here's what you'll need:
- A pair of pliers
- A socket wrench set
- A flathead screwdriver
- Safety goggles
Step 1: Safety First
Safety is always the number one priority. Put on your safety goggles before you start working on your tool box. Gas struts are under pressure, and if they're not handled properly, they can cause injury. So, make sure you're protected.
Step 2: Remove the Old Gas Strut
The first step in replacing the gas strut is to remove the old one. Start by opening your tool box lid all the way. You'll see the gas strut attached to the tool box and the lid. Usually, there are small clips or pins holding the gas strut in place.
Use your pliers to remove the clips or pins. If the clips are really tight, you can use a flathead screwdriver to gently pry them loose. Once the clips or pins are removed, carefully pull the gas strut out of its mounting points. Be careful not to let the gas strut pop out suddenly, as it could cause injury.
Step 3: Measure the Old Gas Strut
Now that you've removed the old gas strut, you need to measure it. You'll need to know the length, diameter, and the mounting type. The length is measured from the center of one mounting point to the center of the other. The diameter is the width of the gas strut tube. And the mounting type refers to how the gas strut is attached to the tool box and the lid.
Make sure you measure accurately, as getting the wrong size gas strut can cause problems. If you're not sure how to measure, you can always take a picture of the old gas strut and bring it with you when you go to buy a new one.
Step 4: Choose the Right Replacement Gas Strut
As a Gas Struts For Tool Box supplier, I know how important it is to choose the right replacement gas strut. You want to make sure it's the right size, has the right amount of force, and is made of high-quality materials.
When choosing a gas strut, consider the weight of your tool box lid. A heavier lid will require a gas strut with more force. You can also look for gas struts that are designed specifically for tool boxes. These gas struts are usually more durable and can handle the wear and tear of regular use.
If you're interested in other types of gas springs, we also offer Gas Spring for Tanning Bed and Gas Spring for Kitchen Cabinet. Our Kitchen Cabinet Gas Spring is designed to provide smooth and reliable operation for your kitchen cabinets.
Step 5: Install the New Gas Strut
Once you've got the right replacement gas strut, it's time to install it. Start by lining up the new gas strut with the mounting points on the tool box and the lid. Make sure the gas strut is facing the right way.
Insert the mounting ends of the gas strut into the mounting points. If there are clips or pins, use your pliers to secure them in place. Make sure the clips or pins are firmly attached, so the gas strut doesn't come loose.
Step 6: Test the New Gas Strut
After you've installed the new gas strut, it's time to test it. Close the tool box lid slowly and then open it again. The lid should open and close smoothly, and it should stay open on its own. If the lid doesn't open or close smoothly, or if it doesn't stay open, you might need to adjust the gas strut or check the mounting.


Step 7: Maintenance Tips
To keep your new gas strut working properly, it's important to do some regular maintenance. You can clean the gas strut with a mild soap and water solution to remove any dirt or debris. Make sure you dry the gas strut thoroughly before using it again.
Also, check the mounting points regularly to make sure they're tight and secure. If you notice any signs of wear or damage, replace the gas strut as soon as possible.
Conclusion
Replacing a damaged gas strut on your tool box is a relatively simple process that you can do yourself. With the right tools and a little bit of know-how, you can have your tool box working like new in no time.
If you're in the market for high-quality gas struts for your tool box or other applications, I'd love to hear from you. We offer a wide range of gas struts that are designed to meet your specific needs. Whether you're a DIY enthusiast or a professional, we've got the right gas strut for you. Contact us today to discuss your requirements and get a quote.
References
- "Gas Strut Installation Guide", Various manufacturers' manuals
- "How to Choose the Right Gas Strut", Industry best - practice guides